Grab a mini band! We are all about adding the resistance today through this new series of awesome exercises. These dynamic movements will work your entire body to help get a strong and lean shape. Time to grab your mini band so we can jump on in!
Are mini band workouts effective?
Working out with mini bands is a great way to add resistance to your workout routine without using weights. They are also small and lightweight, making them easy to take with you on the go. Mini bands are a great tool for toning your muscles, improving your balance, and increasing your flexibility.
Mini bands may be lightweight, but the resistance and outcomes are not. Mini-resistance band workouts are particularly useful since you can target many muscle groups at once. With just a small resistance band and some spare time, you can give your entire body a thorough workout. Each band has a distinct amount of resistance that may be changed by using a different colour.
There are many different exercises that you can do with mini bands. Some exercises target specific muscle groups, while others work your whole body.
6 Awesome Ways to Use a Mini Band
The Exercises:
A piece of fitness advise I gave on how to obtain results from your workout plan was to incorporate resistance into your routine. You should expect a major improvement in your conditioning as a result of this change. I’ve shown you some of these moves previously, like the goblet squat and the hip thrust, but now we’re utilising the tiny band to add a new dimension of muscle-building stimulation.
The resistance might take several forms. There’s usually an emphasis on bulking up. However, using a small band is a fantastic method of upping the ante and gaining muscle at the same time. Furthermore, the greater our exertion, the more calories we will burn. Win-win.
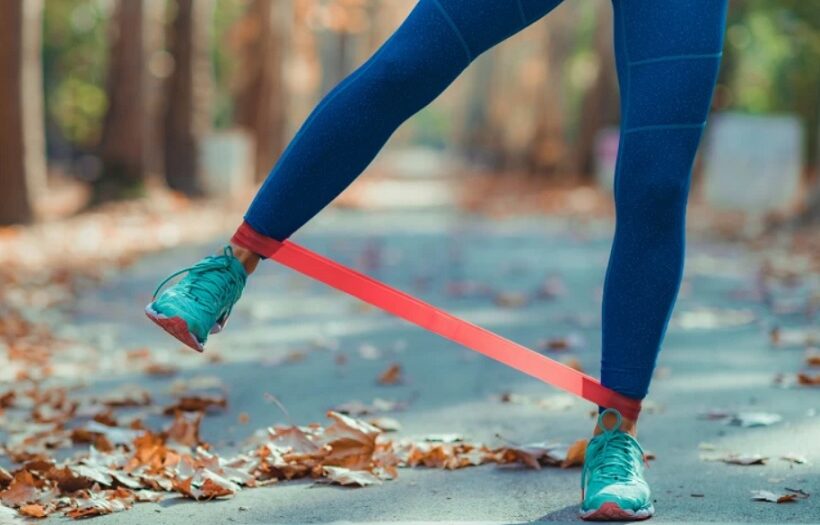
To use the mini band effectively push out into the band as you keep the base of the big top glues to the ground. This is key!
Form Cues
1. Goblet Squat
- Cup your hands to hold the weight.
- Keep the elbows close to your side and pull the shoulder blades together.
- Tuck your tailbone down and close the ribs to stack them over the pelvis.
- Put the majority of your weight in your heels while holding the big toe
- joint firmly into the ground.
- Slightly break at the knees and open the thighs to squat your butt
- down to sit between your heels.
- Pull your hamstring down to touch your calves as the knee closes completely.
- Do not allow the upper back to round or the butt wink under from the rounding of the low back.
- Pause at the bottom before returning to the starting position.
2. Hip Thrust
- Walk your feet out so that you keep contact with the lower shoulder blades on a box or bench.
- Place the heels of your feet back under your knees. Draw the pelvic floor up and the abs inward. Just like a glute bridge on the floor, tuck the tailbone under you and close the ribcage downward into the hips.
- Bridge straight up, not back. Drive up and slightly forward through the heel. Seal the hip bones at the top and hold the lockout. Keep the head connected to the movement of the torso. Look forward when your hips are low and up when your hips are up.
- Lower slowly under control. On the way down, roll your torso slightly forward and push your butt towards your heels. The bottom position will resemble the bottom of a low squat. Make sure this is coming from the hip socket.
3. Dead Bug
- Lay flat on the ground.
- Set into a “hollow position” in which the abs are drawn inward, the ribs are folded down and tailbone is tucked under.
- The abs press the lower back downward into the ground to create a slight rounding to the upper body.
- The arms reach straight overhead while still anchored into the shoulder blades and toward the hips.
- Bend your knees to a 90 degree angle.
- Tuck the knee toward the chest and reach the hand to touch the foot.
- Keep the armpit engaged so that the shoulder does not round over.
- Extend back outward with the leg as you coordinate the reach of the arm back overhead.
- Place your arms pointed towards the ceiling straight up from the shoulders
- The low back and shoulder blades stay on the ground.
- Keep your core stable and move your arms and legs independently.
4. Zig Zag Walks
- Stand with your heels positioned inside of your shoulders, approximately under your armpits.
- Stack your spine by tucking the tailbone under, folding the ribs down and raising the collar bone up.
- Tuck your elbows close to your sides and pull the shoulder blades together.
- Squeeze the muscles of your back into your spine in order to support the weight with a tight upper back.
- Break slightly at the knees to unlock the legs. The base of the big toe is grounded and glutes lightly squeezed. The thighs open enough to keep each knee lined up between the hip and ankle. (This is known as position one).
- Put the majority of your weight in your heels while holding the joint at the base of the big toe firmly into the ground.
- With the tailbone tucked under, push the glutes backward as the torso hinges forward slightly to change the back angle – maybe 10 to 15 degrees – and load the glutes and hamstring muscles.
- Do not distort the spine. Move from the hip socket only into a golfer’s stance. Once you have changed the back angle, hold it for the entirety of the squatting portion.
- Move your right foot out and wide while staying over the hip. Bring the left leg to touch at the heel of your right leg.
- Alternate on the right and then left sides each time.
5. Wide Outs
- Tuck your tailbone down and close the ribs to stack them over the
- pelvis.
- Put the majority of your weight in your heels while holding the big toe
- joint firmly into the ground.
- Slightly break at the knees and open the thighs to squat your butt
- down to sit between your heels.
- Pull your hamstring down to touch your calves as the knee closes
- completely.
- Do not allow the upper back to round or the butt wink under from the
- rounding of the low back.
- Imagine you are ducked under a small table as you crunch down into the squat
- Stay under this table as you jump out pressing into the band.
- Continue to use the base of the big toe to stabilize your position as you jump in and out.
- Keep the arms low and in front of your body to help maintain balance in your body.
6. Push Up Walks
- Place your body on the floor in a pushup position.
- Set into a “hollow position” in which the abs are drawn inward, the ribs are folded down and tailbone is tucked under.
- The abs force the lower back upward to create a slight rounding to the upper body.
- The torso and pelvis remain completely steady. Move from the hip socket only in order to lift the leg out and to the side.
- Maintain a firm position so that you stay over your shoulders.
- The right arm will move with the left leg and the left arm with the right leg in a continuous pattern.
Is it OK to use mini resistance bands everyday?
To prevent overtraining and injury, it is best to give your body a few days off from resistance training every few weeks. Resistance training can be beneficial, and up to six sessions per week may be appropriate depending on your goals and experience.
How likely you are to make a full recovery is another crucial factor to think about. For instance, if you have a good recovery rate in between exercises and finding the time to exercise every day isn’t too much of a problem, then making exercise a daily habit might be quite beneficial.
However, if you have a hard time healing and remain painful for days after exercising, you may need to allow yourself additional rest.
Pick and choose from these exercises to add variety to your next workout. Feel the booty burn!